
 When you think of the autumn harvest, you probably think squash and pumpkins and root vegetables like carrots. This creamy pasta sauce is full of squash and pumpkin and says comfort food and cozy evenings. It’s also simple to make, makes a beautiful base for further flavors and additions, and stores perfectly in the freezer for later use!…
Archives for 2016
Savory Baked Eggs

Guys, this is a special recipe! It is 1) quick and easy to make, 2) is healthy, and 3) tastes amazing! Silky, just-set eggs nestled in a savory tomato sauce (with a little spice, if you like), with some wilted greens and Parmesan melted and just beginning to brown on top—it’s heaven! And you can also have these savory baked eggs for breakfast, lunch, and dinner!
…
30-Minute Pumpkin Spice Rice Pudding

I know, I’m on a fall dessert kick, first with the last week’s warm Calvados apple galette, and now with a rice pudding! This rice pudding is special—it’s full of pumpkin spice goodness and it’s also ready in 30 minutes! Plus, it’s dairy-free and gluten-free, and doesn’t require the hours of stirring of traditional rice pudding methods. This pumpkin spice rice pudding is creamy, sweet, spiced, finished in a hurry, and absolutely delicious. It’s a dessert to enjoy warm on cold fall evenings!
…
Warm Calvados Apple Galette

I love pumpkin and pumpkin spice as much as the next person (just look at my recipes for pumpkin spice panna cotta and spiced pumpkin and carrot soup), but I also love the fact that fall is apple season! And there’s almost nothing as perfect to celebrate apple season with as this warm Calvados apple galette! It’s fall in a crust—seriously! Warm, spiced, and everything you think about when you think cozy!
…
Spiced Pumpkin and Carrot Soup

It’s still warmish during the mid-days around here, but the mornings and evenings are chilly! And what’s better for chilly evenings than soup? Especially this ultra-flavorful, velvety spiced pumpkin and carrot soup that uses the best of fall’s produce!

When we moved last month, I found the pumpkin puree I made last year from the little sugar pumpkins. I had to use it, but for what? I also had some carrots that needed to be used up, and then the idea popped into my head—soup!
Also, one of my favorite things during the cold months (besides soup) is something with spice in it—it just gives me that warm, cozy feeling, and this soup does just that! It’s absolutely packed full of bright, warm flavors and a little bit of spice to warm you up even on the coldest of days!…
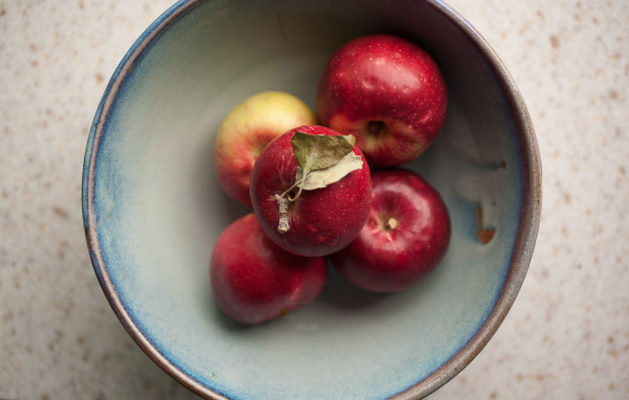
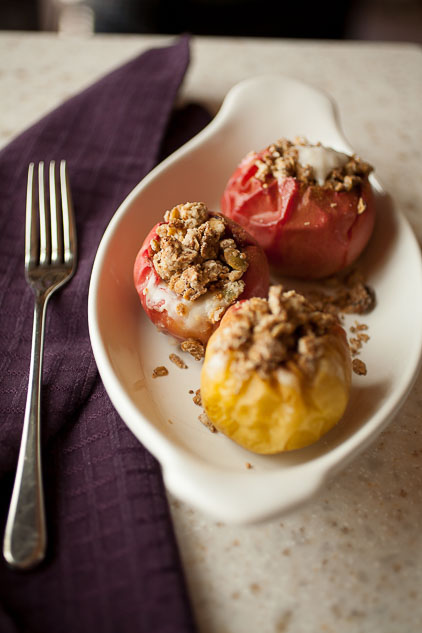
Breakfast Baked Apples with Granola Crumble
Almost nothing says fall and fall produce more than baked apples and apple cider, and this recipe combines both baked apples and apple cider with a crumble topping made with granola!
 I am really excited about this recipe for breakfast baked apples with granola crumble. I was excited when I came up with it, I was super excited to test it out (and eat it, of course), and now I’m excited to tell you about it. This is a recipe for breakfast that has everything—a little bit of sweet, a little bit of crunch, a little bit of spice, and a creamy element. Put it all together and you have something that is warm, comforting and completely satisfying for those chilly early fall breakfasts or brunches: breakfast baked apples with granola crumble!
 Think about it like this—mix apple pie filling with an apple crumble topping and then mix in cool, creamy ice cream. Then make it a little healthier with granola for the crumble and yogurt instead of ice cream, take out some of the sugar, and serve it for breakfast—that what you’re getting! It’s not exactly a quick breakfast, but it is simple and most of the time is spent cooking in the oven, so it doesn’t require much work on your part, especially if you use store-bought granola. Plus, it makes your kitchen smell like apple cider, which is always a plus.
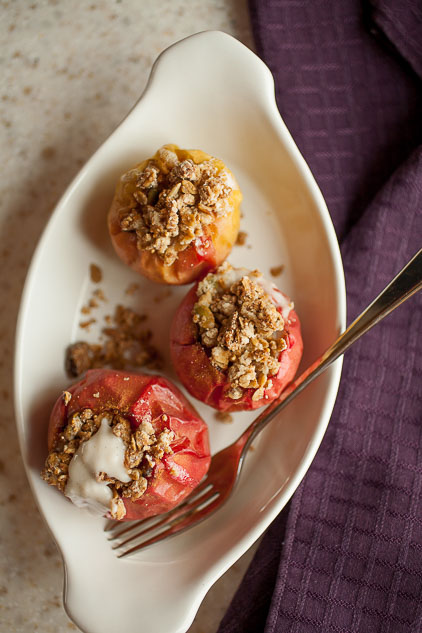 This also makes a perfect brunch recipe for a crowd—you can make the apples the night before and then just heat them up in the morning with the yogurt and granola. There you have a fall brunch for a crowd and you can spend more time drinking mimosas and talking with guests than you can when you make pancakes.
Note: If you’re looking for allergy- and sensitivity-friendly swaps for ingredients, you’ll find them after the recipe!
This also makes a perfect brunch recipe for a crowd—you can make the apples the night before and then just heat them up in the morning with the yogurt and granola. There you have a fall brunch for a crowd and you can spend more time drinking mimosas and talking with guests than you can when you make pancakes.
Note: If you’re looking for allergy- and sensitivity-friendly swaps for ingredients, you’ll find them after the recipe!
When you cook the apples the night before, make the granola crumble, add it and the yogurt to the apples and heat them for ten minuts! You’ll have a fun, decently healthy breakfast on the table in ten to fifteen minutes!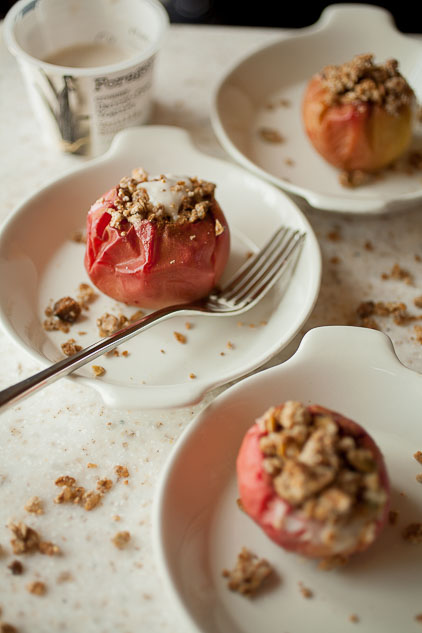
 I am really excited about this recipe for breakfast baked apples with granola crumble. I was excited when I came up with it, I was super excited to test it out (and eat it, of course), and now I’m excited to tell you about it. This is a recipe for breakfast that has everything—a little bit of sweet, a little bit of crunch, a little bit of spice, and a creamy element. Put it all together and you have something that is warm, comforting and completely satisfying for those chilly early fall breakfasts or brunches: breakfast baked apples with granola crumble!
Think about it like this—mix apple pie filling with an apple crumble topping and then mix in cool, creamy ice cream. Then make it a little healthier with granola for the crumble and yogurt instead of ice cream, take out some of the sugar, and serve it for breakfast—that what you’re getting! It’s not exactly a quick breakfast, but it is simple and most of the time is spent cooking in the oven, so it doesn’t require much work on your part, especially if you use store-bought granola. Plus, it makes your kitchen smell like apple cider, which is always a plus.
This also makes a perfect brunch recipe for a crowd—you can make the apples the night before and then just heat them up in the morning with the yogurt and granola. There you have a fall brunch for a crowd and you can spend more time drinking mimosas and talking with guests than you can when you make pancakes.
Note: If you’re looking for allergy- and sensitivity-friendly swaps for ingredients, you’ll find them after the recipe!
I am really excited about this recipe for breakfast baked apples with granola crumble. I was excited when I came up with it, I was super excited to test it out (and eat it, of course), and now I’m excited to tell you about it. This is a recipe for breakfast that has everything—a little bit of sweet, a little bit of crunch, a little bit of spice, and a creamy element. Put it all together and you have something that is warm, comforting and completely satisfying for those chilly early fall breakfasts or brunches: breakfast baked apples with granola crumble!
Think about it like this—mix apple pie filling with an apple crumble topping and then mix in cool, creamy ice cream. Then make it a little healthier with granola for the crumble and yogurt instead of ice cream, take out some of the sugar, and serve it for breakfast—that what you’re getting! It’s not exactly a quick breakfast, but it is simple and most of the time is spent cooking in the oven, so it doesn’t require much work on your part, especially if you use store-bought granola. Plus, it makes your kitchen smell like apple cider, which is always a plus.
This also makes a perfect brunch recipe for a crowd—you can make the apples the night before and then just heat them up in the morning with the yogurt and granola. There you have a fall brunch for a crowd and you can spend more time drinking mimosas and talking with guests than you can when you make pancakes.
Note: If you’re looking for allergy- and sensitivity-friendly swaps for ingredients, you’ll find them after the recipe!
Breakfast Baked Apples with Granola Crumble
Prep time
Cook time
Total time
This recipe for breakfast baked apple with granola crumble combines the best of fall in a warm, filling, and satisfying breakfast: baked apples, fall spice, yogurt, and a granola crisp! You can even bake the apples the night before for a quick, fuss-free brunch!
Author: Samantha Gallegos
Recipe type: Breakfast
Serves: 6
Ingredients
- 6 semi-sweet apples
- 1 cup of granola, either homemade or store-bought
- ½ cup of vanilla yogurt or Greek yogurt
- 1 cup of water
- 2 Tbsp. softened butter
- 1 Tbsp. flour
- 1 tsp. cinnamon
- 1 tsp. vanilla
- ½ tsp. nutmeg
- ¼ tsp. ginger
- ¼ tsp. nutmeg (You can also use 1 Tbsp. pumpkin pie spice and 1 tsp. cinnamon)
- ¼ tsp. salt
Instructions
- Heat the oven to 375°.
- Combine the spices in a small bowl.
- Core the apples then set into a baking pan or casserole dish. Sprinkle the spice blend, salt, and vanilla on top of the apples, dot with small bits of butter, then pour the water into the bottom of the pan.
- Place the apples in the oven for half an hour to forty minutes, or until the apples are soft.
- While the apples are cooking, combine the granola with 1 tablespoon of butter and the tablespoon of flour with either a fork or your fingers.
- Take the pan out of the oven. The water will probably have evaporated, but if not, take the apples out and pour out the water. Put the apples back into the pan, fill with the yogurt, and top with the granola crumble mixture.
- Place the apples back into the oven for 10 more minutes, or until the granola crumbled mixture is cooked through (you’re cooking the flour and butter).
- If you’d rather not have the yogurt warmed, you can cook the apples and granola crumble mixture together, then pour the yogurt over top.
- Serve!
When you cook the apples the night before, make the granola crumble, add it and the yogurt to the apples and heat them for ten minuts! You’ll have a fun, decently healthy breakfast on the table in ten to fifteen minutes!
Swaps:
- Instead of apples, you can use pears
- To make this recipe gluten-free, you can use a gluten-free flour and a gluten-free granola.
- To make this recipe paleo-friendly, use a paleo granola and an alternative flour like coconut or cassava (almond flour probably would not work, however), and yogurt made with alternative milks.
- To make this recipe dairy-free, use yogurt made with alternative milks like coconut, almond, or cashew.
So, there you have a delicious fall breakfast or brunch, and the apples in the stores right now are so good and perfect for this recipe—nothing mushy or tasteless.
‘Till next time!

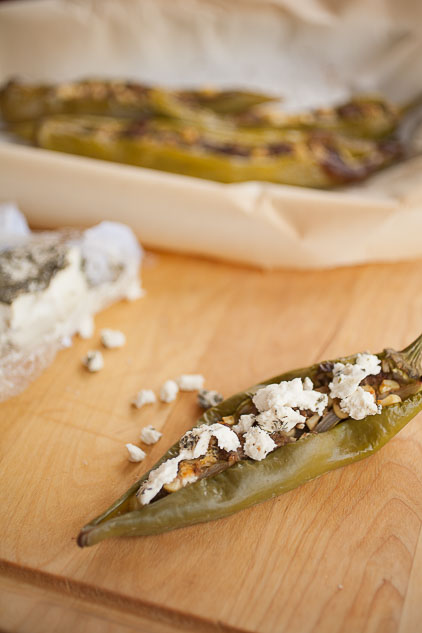
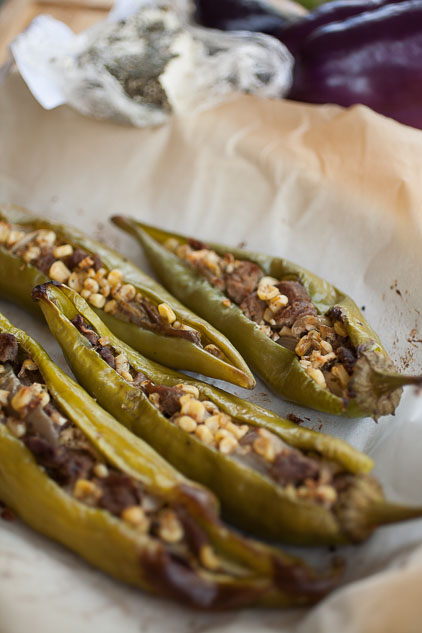
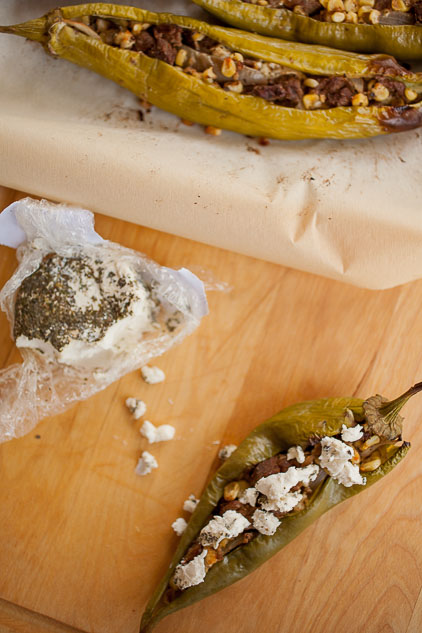
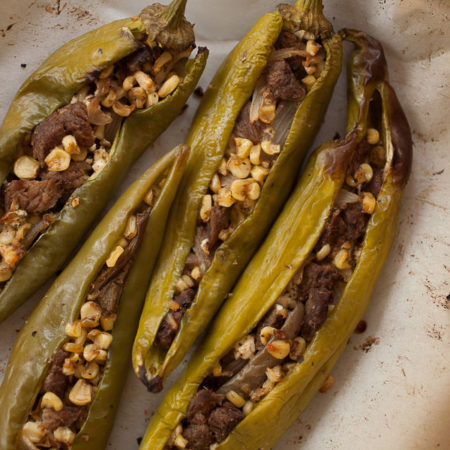
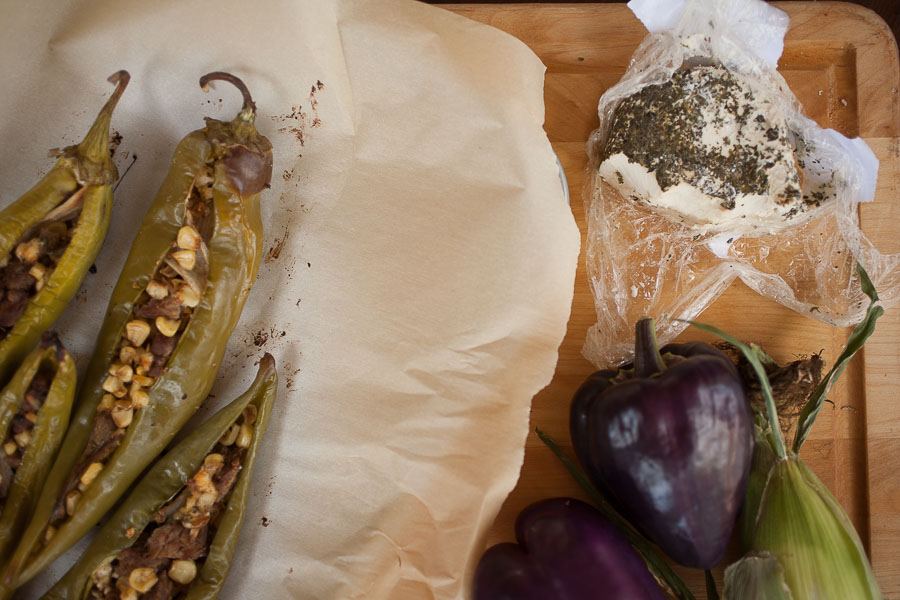
Fajita-Stuffed Hatch Green Chile
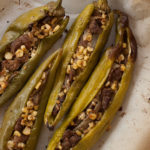
One thing that marks the end of the summer and the beginning of fall here in New Mexico is the smell of roasting green chile. It’s one of those scents that marks the change in season and it promises sweet, flavorful, buttery, charred heat—it’s so good. That’s why I’m capturing the Hatch chile harvest in a recipe for Fajita-Stuffed Hatch Green Chile!
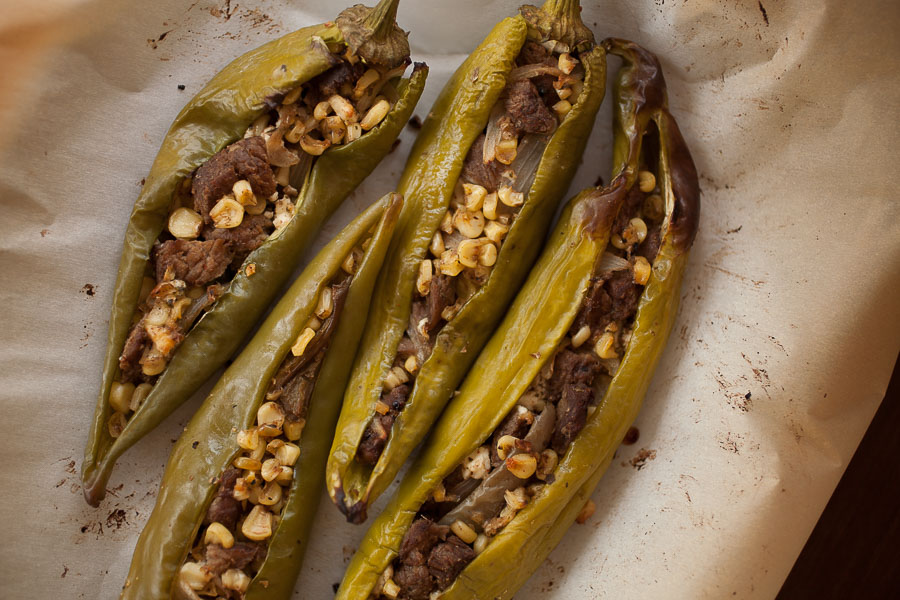
If you can find Hatch chile in your local store, you really have to try it! It’s not just heat (and if you can find mild, there won’t be much of that anyway). Hatch chile really has a unique flavor, buttery and sweetly peppery, almost like a spicy bell pepper, but with a bit more tang. Just for fun, I also used all local New Mexican ingredients to celebrate the end-of-summer harvest: the steak is from Sweet Mercy Farms, peppers from Red Tractor Farm, sweet corn from Schwebach’s and the onions from an unnamed booth. This recipe has minimal ingredients and comes together quickly. You’ll have a warm, delicious harvest-time meal in under an hour!
It’s certainly not something you have to do. It’s just a lot of fun for me, especially because we’ve made it a habit to go to the farmer’s market every Saturday morning and I’m like a kid in the candy store! And if you can’t get Hatch green chile, a mild green, large green chile like Anaheim or poblano will work just as well! In fact, Anaheims were developed from Hatch green chile, so you’ll get a similar result (they’re just not quite as flavorful).
We have a law here in New Mexico that to be labeled Hatch green chile, it has to be from Hatch New Mexico, so make sure you look for the real thing if you can!
Fajita-Stuffed Hatch Green Chile
Prep time
Cook time
Total time
Fresh harvest ingredients make a delicious filling for this recipe for fajita-stuffed Hatch green chile--it's a taste of New Mexico for dinner!
Author: Samantha Gallegos
Recipe type: Dinner
Cuisine: Southwestern New Mexican
Serves: 4
Ingredients
- 4 Hatch, Anaheim, or poblano chile peppers
- 1 steak of your choice sliced into short strips or ½ pound of ground beef
- 2 medium bell peppers, sliced
- 1 onion, sliced
- The kernels from 2 ears of corn, about a cup
- ½ C. cotija cheese, or any type of mild Mexican or Spanish cheese (although cheddar would work well, as well)
- 1 garlic clove, thinly chopped
- 1 tsp. cumin
- 1 tsp. dried oregano
- ½ tsp. garlic salt
- ½ tsp. smoked paprika (or regular paprika, if you don’t have smoked)
Instructions
- Preheat the oven to 350°.
- Chop the steak into short, thin strips. Chop the peppers and onion into strips and finely chop the garlic clove. Place the large end of the ear of corn into a bowl and cut off the kernels.
- Heat a tablespoon of olive oil or other neutral oil into a pan over medium to medium-high heat. Saute the onions and garlic until translucent, then add in the steak, peppers, and corn. Add the spices. Sauté until the outside of the steak is done, but the inside is still red.
- Remove the filling into a bowl and mix with half of the cheese.
- Cut open the chile peppers, but don’t cut the top off. Carefully remove all the seeds. WARNING: Do not touch your skin after handling the chile pods or seeds, especially your eyes, because it will burn you! Wash your hands thoroughly before you touch anything else, or use gloves like I do.
- Place the peppers onto a foil-lined pan and spoon the filling into the peppers.
- Place the peppers into the oven for 30 minutes, or until the peppers are soft and the cheese has browned and/or melted.
- Take out of the oven and sprinkle the rest of the cheese on top before serving the peppers.
Wherever you get the ingredients, and whatever ingredients you choose to include, these fajita-stuffed Hatch green chile peppers are the perfect way to use up all the late-summer harvest goodies!
There won’t be a new blog next week because we’re moving, but I’m really excited to share the recipe going up the following weekend, so make sure you check back.
‘Till next time!

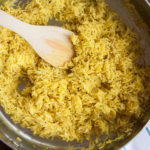
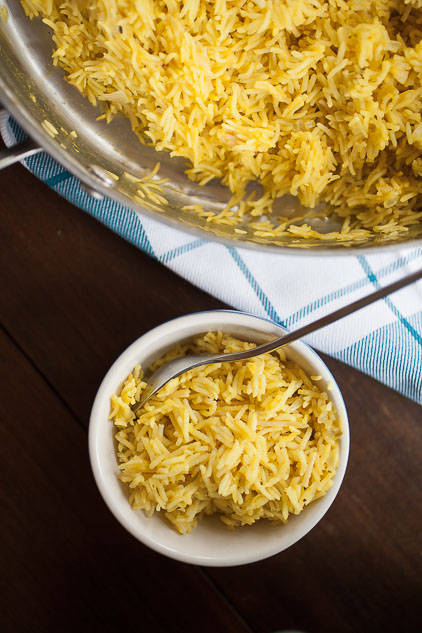
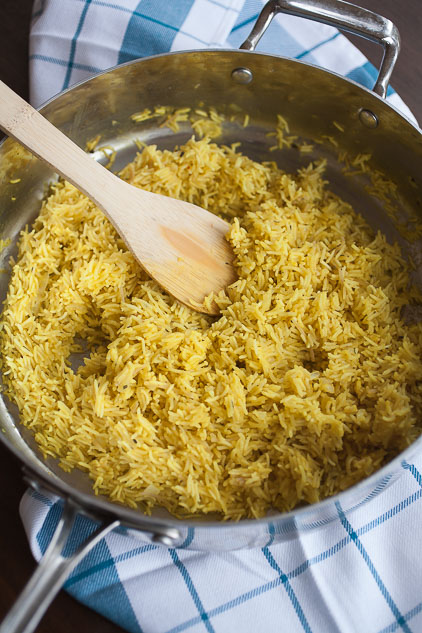
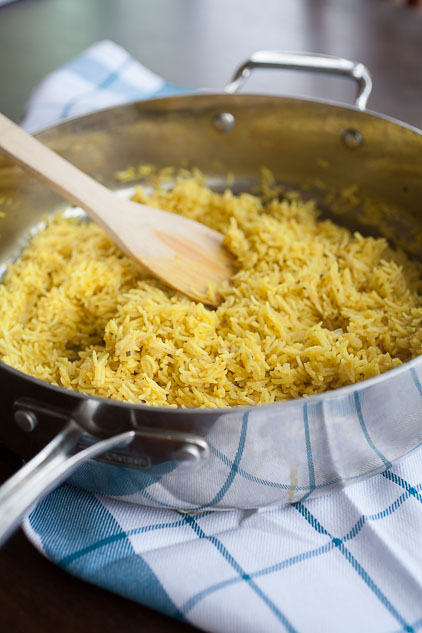
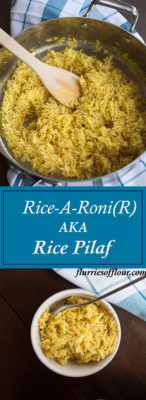
Rice-a-Roni® (AKA Rice Pilaf)
The first time I had Rice-A-Roni® was in high school when I was over a friend’s house for dinner. I didn’t even know what it was, to be honest, but darn it, it was good, especially for a kid who only got “treats” like these when I was over at someone else’s house (I didn’t get to taste Texas toast garlic bread until I was in elementary school and, again, over at a friend’s house). The food at home was wonderful and healthy, but it was fun to eat these types of treats when I was at someone else’s house.

Fast forward to today, and Rice-A-Roni is one of my husband’s comfort foods we buy every once in a while. We’d get it more often, but it has a long list of not-so-healthy ingredients and the salt content is kind of ridiculous. So, loving him as I do, I set out to make a copycat recipe.
I learned something really interesting while I was browsing through recipes—the original Rice-A-Roni recipe is based on a recipe for rice pilaf! I was intrigued. According to this NPR article, the creators of Rice-A-Roni, the DiDemenicos, lived next to an Armenian immigrant in San Francisco in the 1940s. Lois DiDemenico, a young immigrant herself, didn’t really know how to cook. Her next door neighbor, Pailadzo Captanian, took her under her wing and taught her several dishes, including a recipe for rice pilaf. The DiDemenico family took the recipe and created the product we know today.
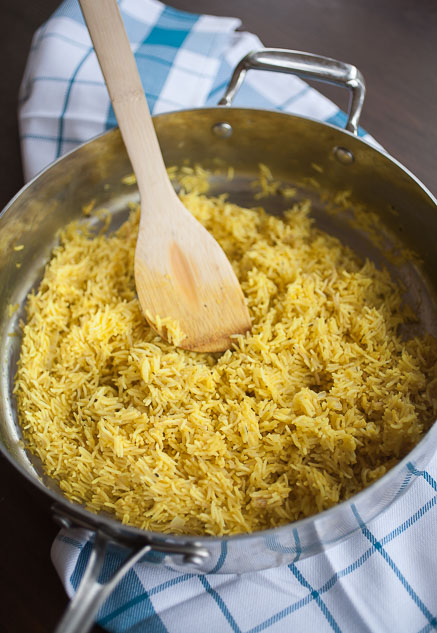
Rice pilaf is an ubiquitous Middle Eastern rice dish—each family, each country, each region has its own variation and there’s no one way to make it. It generally starts with a base of aromatics and results in a deliciously fluffy dish full of savory flavor. The secret to the fluffiness is to dry-cook the rice until it’s lost its translucency and looses some of its starch. This will help the rice absorb more liquid and make it fluffy instead of gummy.
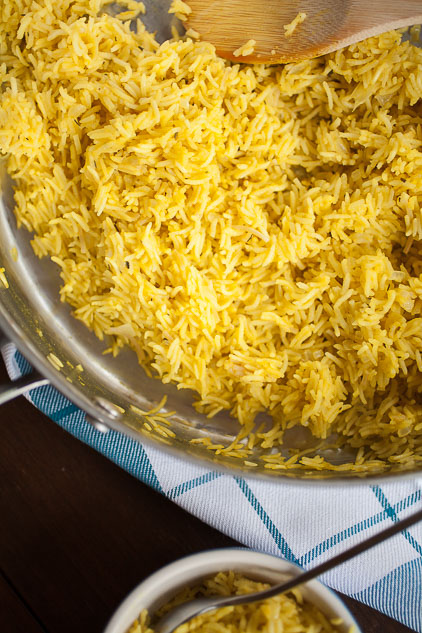
This recipe also include turmeric, just like the original recipe , which is what gives it that brilliant yellow color—plus, turmeric is really good for you.
Armed with that knowledge, and stealing some ingredients from the Rice-A-Roni box, I set out to make a replacement for the boxed version. It’s not as easy as pouring the content of the box into a pan, but it’s still a quick dish to make (on the table in just about half an hour), and I promise it’s completely worth it—it’s husband approved!
Rice-a-Roni® (AKA Rice Pilaf)

Prep time
Cook time
Total time
This fluffy, flavorful recipe for rice pilaf is a healthy Rice-a-Roni® copycat your family will love just as much as the boxed version and it's on the table in about 30 minutes!
Author: Samantha Gallegos
Recipe type: Side Dish
Cuisine: Middle Eastern
Serves: 6
Ingredients
- 2 ½ cups of low sodium chicken stock (has to be low sodium!)
- 1 ¼ cup of basmati rice
- 1 serving of vermicelli or other pasta broken in to small bits (I used GF rice pasta)
- 1 onion, finely chopped
- 1 clove of garlic, finely chopped
- 1 Tbsp. olive oil
- 1 Tbsp. butter
- ½ chicken bouillon cube or ¾ tsp. of Better Than Bullion (you can use less if you want less sodium)
- Italian flat-leaf parsley or 2 Tsp. Italian seasoning
- ½ tsp. turmeric
Instructions
- Heat olive oil in a sauce pan or pot over medium to medium-low heat until the surface is rippling, then sauté the onion and garlic until fragrant and translucent.
- Melted the butter, then add the dry rice, stirring it around until the rice has become less translucent (not quite so white), but not brown.
- Add in the bullion, turmeric, chicken broth, parsley or Italian seasoning and pasta and stir until fully combined.
- Let the rice cook 15 to 18 minutes, stirring infrequently (you don’t want to agitate the rice and cause it to release too much starch), until all the liquid has been absorbed but before the rice starts to stick to the bottom of the pan or pot.
- Take the pan or pot off the heat, cover, and let sit for five minutes.
- Serve and enjoy!
There you have a delicious copycat side dish, but this time, it’s pretty healthy and comes without all those strange ingredients or the same level of sodium.
‘Till next time!
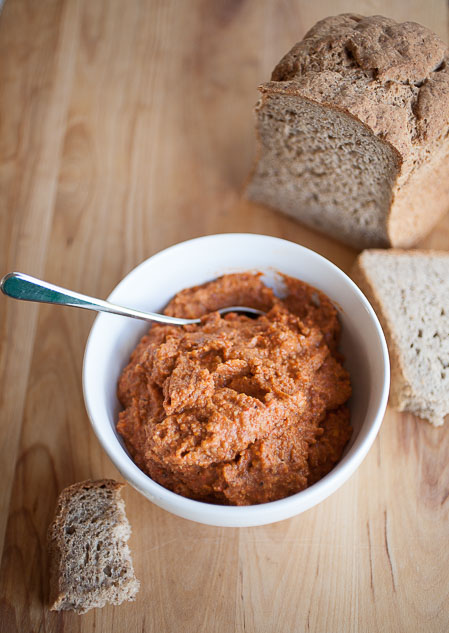
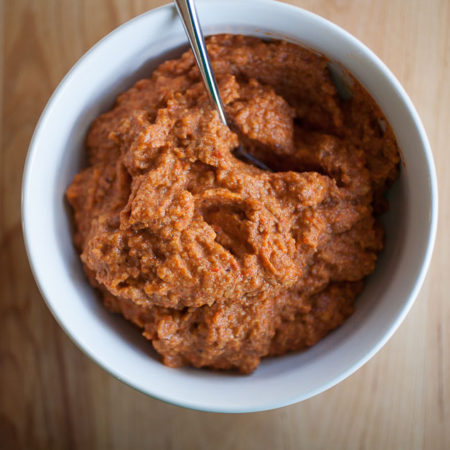
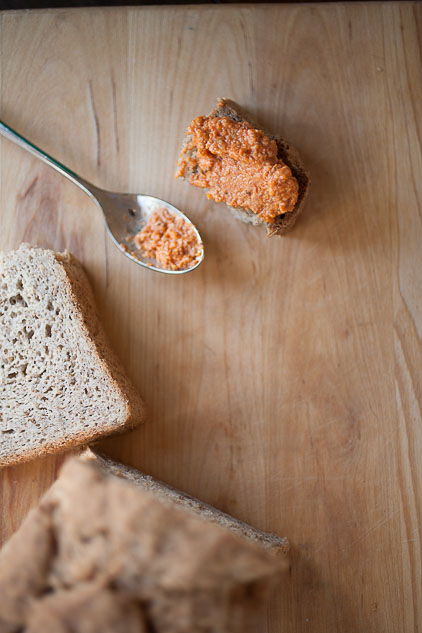
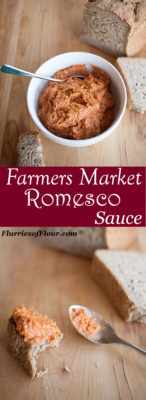
Farmers Market Romesco Sauce

 The first time I had romesco sauce was on a trip to San Francisco to visit old friends. We had lunch at Greens, a well-known vegetarian restaurant at the Presidio. I ordered their roasted veggie slab, an enormous freshly-made ciabatta sandwich piled high with roasted veggies. To this day I remember how amazingly delicious that sandwich was and how beautiful the view of the bay and the Golden Gate from our table next to the big picture window (no fog that day).
Besides the ciabatta and the perfectly grilled vegetables, what really made the sandwich so memorable was the romesco sauce. It was this perfectly sweet, yet savory, yet slightly spicy spread that added an entirely new dimension to the sandwich.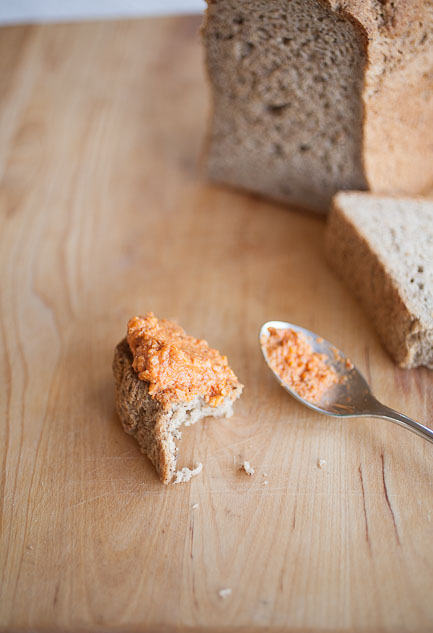
Thus began my love affair with romesco sauce.
Romesco sauce, or salsa romesco, is Spanish in origin, specifically the Catalonia area in North West Spain. Legend says that the fisherman of Tarragona (the specific town in the Catalonia region from which romesco is supposed to come) would make this sauce with a mortar and pestle to eat with the fresh catch of the day.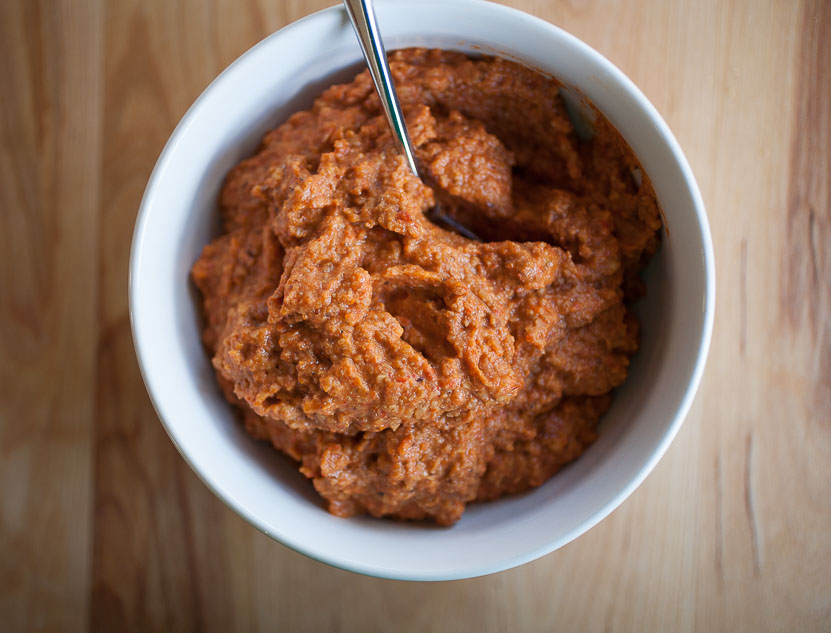
It’s rich, creamy, and absolutely full of bright, sweet-roasted-savory flavor. It’s such an amazing addition to any meal you can roast on the grill, like vegetables, chicken, beef, corn on the cob, broccoli, in a salad, on a roasted veggie sandwich… (I should probably create a recipe, come to think of it…). Also, of course, it goes well with fish. One word of caution: because it’s such a strongly flavorful sauce, I wouldn’t use it with anything too delicate, like a mild-flavored white fish. The romesco would just end up being overwhelming and the only thing you could taste.
It also lends itself perfectly to the inclusion of farmers market produce, especially tomatoes and peppers. It’s what I used to make the romesco in these pictures. It just adds that special addition of sweet (and sweet pepper) flavor. Thus, this farmers market romesco.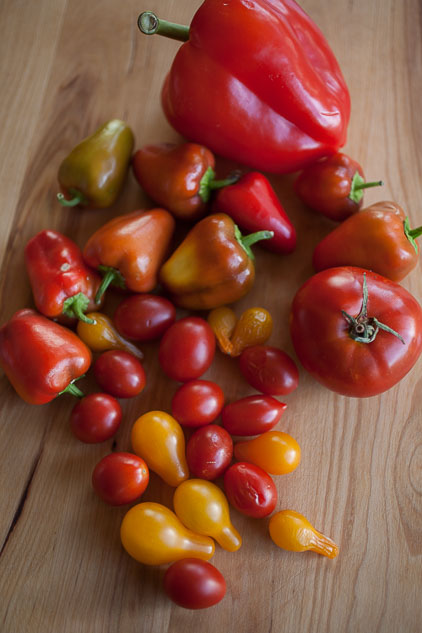
I admit, this recipe isn’t as simple as most of the recipes I post here—definitely not a set-it and forget-it type of sauce. You have to prep and roast many of the ingredients. It’s absolutely worth it, though, and if you’re already grilling, why not add a few more ingredients?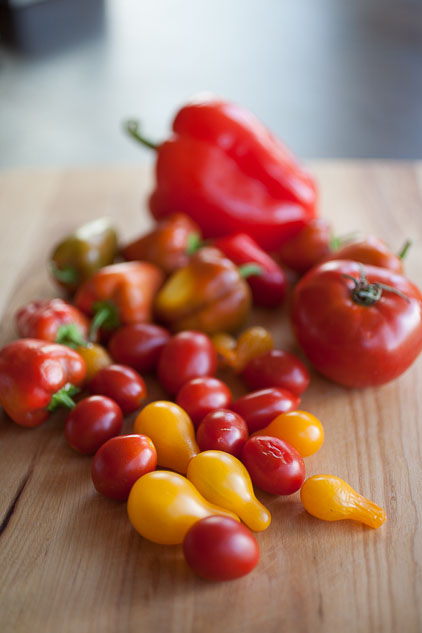
There are also two ingredients you may not have but are pretty essential to give this recipe its taste—smoked Spanish paprika and sherry vinegar. The smoked paprika gives the sauce a deeper, smoky flavor and the sherry vinegar gives a slightly acidic but mildly sweet addition. A vinegar like balsamic would be too strong, in my opinion.
Also, you’ll need to roast peppers and peel them. If you need more information, you can look at the blog on roasting green chile and follow the instructions there—the result will be the same no matter what pepper you use.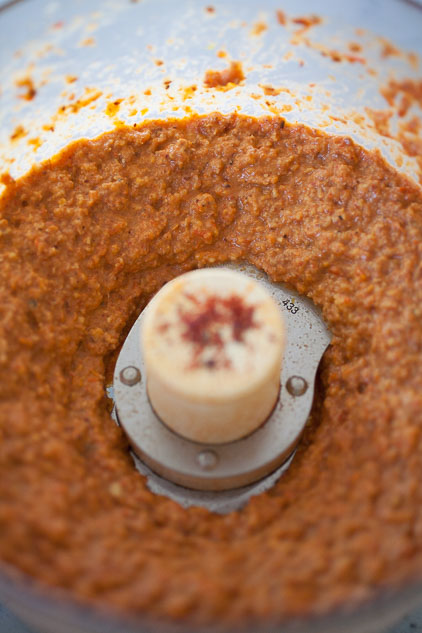
Farmers Market Romesco Sauce
Prep time
Cook time
Total time
Author: Samantha Gallegos
Recipe type: Sauce
Cuisine: Spanish
Serves: 12
Ingredients
- 1 slice of day-old crusty bread (gluten free works very well if you so desire)
- ¼ C of almonds
- 3 to 5 cloves of garlic
- 2 large bell peppers
- 1 tomato (or a cup of little ones)
- ¼ C. olive oil
- 2 Tbsp. sherry vinegar
- 1 Tbsp. smoked Spanish paprika
- Salt and Pepper
Instructions
- Toast the almonds in a pan over medium heat, stirring often, until just golden.
- Toast the piece of bread until golden.
- Roast the peppers and tomatoes on the grill or under the broiler until soft or, in the case of the peppers, charred all over, about 20 minutes (but check often).
- Put the peppers into a plastic bag or into a bowl covered with plastic wrap and let sit for 15 to 20 minutes. Remove the skin from the peppers along with the core and seeds.
- Place all ingredients into a food processor and puree until smooth. You can add any seasoning to taste.
- Romesco sauce can be kept in an air-tight container for up to 5 days.
It takes a bit of prep, but I promise it’s completely worth it–we’ve been eating the batch I made last week on pretty much everything–no joke!
‘Till next time!
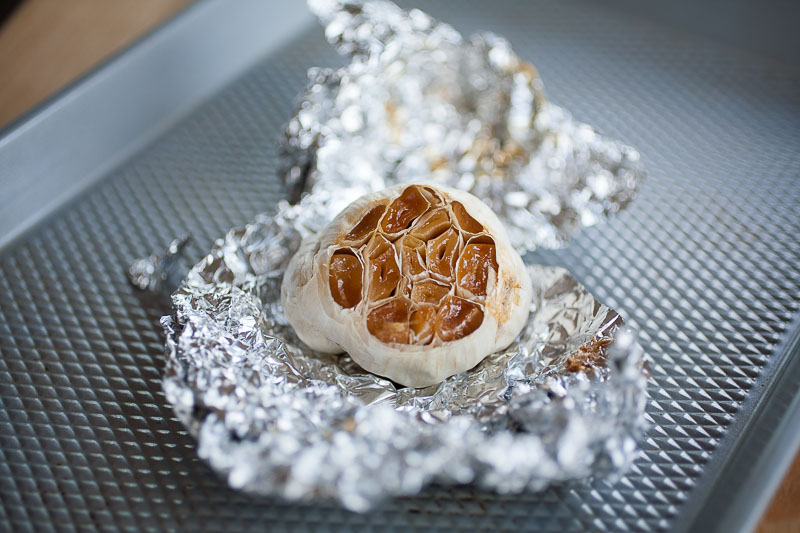
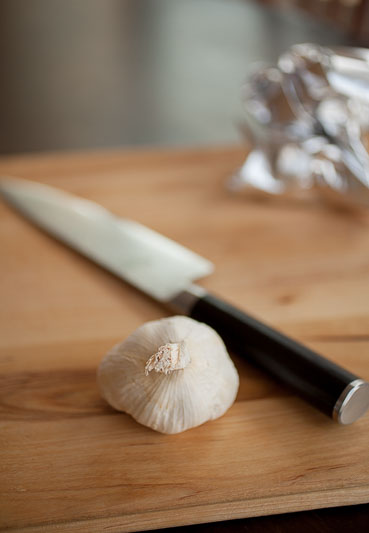
Homemade Roasted Garlic

 I like garlic, but roasted garlic takes this basic kitchen staple to an entirely new level.
You might have had roasted garlic before, probably at a restaurant, maybe in a compound butter or in a dish (like the time, on a date, I bit into a piece of bread thinking it was cinnamon raisin bread and, wow, that was a surprise. Still tasty, but definitely not what I was expecting…). Thankfully, you don’t have to eat out just to have roasted garlic. It’s probably one of the simplest things to make at home—it just requires patience.
It so incredibly good in pretty much every savory dish—the roasted garlic compound butter I posted here a few weeks ago, in pasta dishes, egg dishes, mixed with roasted veggies, and even just spread over a piece of toasted bread.
If you haven’t had roasted garlic, don’t imagine the taste of raw garlic. Roasted garlic takes on a mild, sweet-yet-savory flavor with just a hint of that garlic bite. It really adds such a layer of flavor to any dish!
It’s kind of heavenly, just like the smell that fills your house while the garlic is roasting. I promise it will make your mouth water!
The process is, again, very simple. You take an entire bulb of garlic, but don’t peel it (although you can peel the very outer layers off if they’re already flaking). Instead, just cut the top off so the tops of the cloves are exposed. You’ll pour olive oil over the bulb, just enough to cover the top and seep into the cloves. Then, you’ll cover the bulb snugly in foil, stick it in the oven, and wait for the goodness!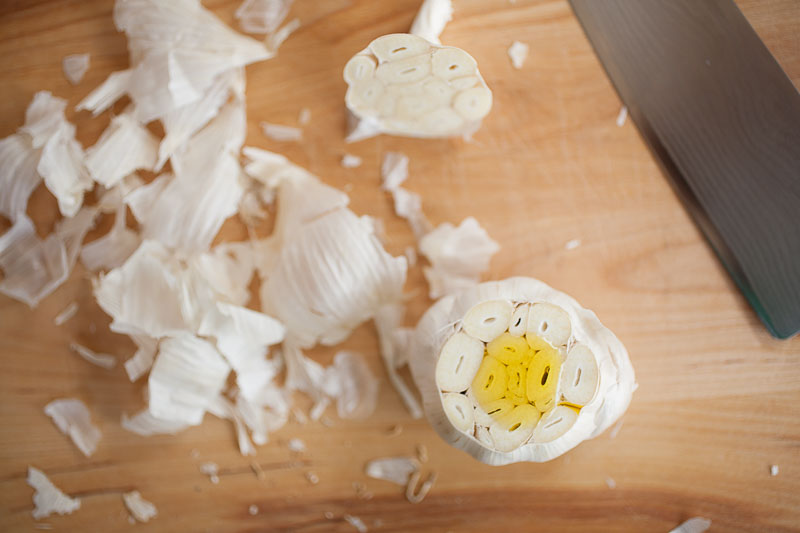
Homemade Roasted Garlic
Prep time
Cook time
Total time
Author: Samantha Gallegos
Serves: 15
Ingredients
- 1 full garlic bulb
- Enough olive oil to cover the top of the garlic bulb
Instructions
- Preheat the oven to 350°. Alternately, you can heat your grill to medium heat.
- Cut off the top of the garlic bulb and pour enough olive oil to cover the top of the garlic bulb.
- Cover the bulb tightly in aluminum foil and place in the oven or on the grill.
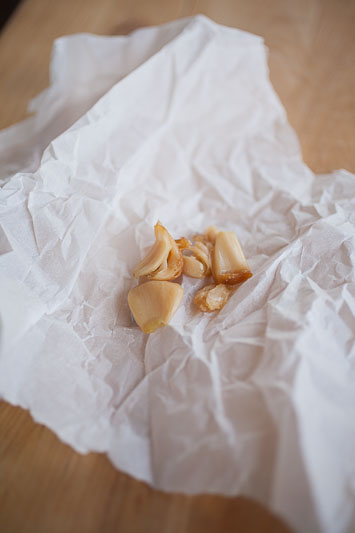
- Let the garlic roast for an hour or more until the garlic bulbs are a deep caramel brown and soft (you can take the packet out of the oven and unwrap it to check).
- Remove garlic from its peel and use any way you wish!
It’s that simple! Really, all you need is patience as the garlic fills your kitchen with this rich, garlicky, savory-sweet smell. It’s hard to resist.
‘Till next time!